Wall Art {using clip frames}
I promise,you will not be disappointed-this is the coolest craft ever!
When I first saw this craft/project in a magazine, I was
completely intimidated.
I love doing crafts, but I'm not that great at it.
I can do some things really well, and I am all for a new project,
but I don't do them too often.
But, I had to give this a try, and I knew I could count
on my artist husband to pretty much lean on during it.
{Thanks for that husband.}
So without further adieu,
here is this amazing project, I know
you'll be inspired, or at least that is my hope.
And it's something you can do with your significant other!
WHAT YOU WILL NEED:

Plain glass frames with silver clips. We ordered them from
Adormama We ordered 15 frames,
in size 8X10 (that is the part of this that can be spendy), but you are creating
a lifetime piece here; this is not just an ordinary craft.

The paper we chose.
You will need paper that you are in love with. The original instructions in the magazine showed the people using a Wallpaper that was $625 dollars! Can you believe that?! Obviously there was no way we were going to do that, so we figured we'd look for wrapping paper.
But instead we went through all my scrapbook paper, and couldn't find a one that we liked enough.
I'm telling ya, it has to be one you are in love with.
In our search I came across some vintage wrapping paper that my husbands gramma had given me years ago, and my husband brought that to the UPS store and made color copies. He made about 18 copies{just to have extra on hand, remember, I'm clumsy}, and the total was around $7.00 bucks!
{you will technically need 15 copies for this project)

Double sided tape, paper cutter, or good scissors, 15 of your favorite most cherished pictures together in black and white, and some coffee or tea.

The sheets of paper were slightly larger than 8x10, so we just trimmed off the extra.

Remove the glass and clips from the frames. This can be tedious, but it's not so bad. Lay the sheet of paper on the body of the frame, then using the tape, place one long piece along the back of the photo,
and eye-ball it into the center (don't measure, you'll stress yourself out)!
and apply to your pretty paper.


Put the glass back on {over the paper and photo}, and your clips and voila!
Look what you have! Isn't this cool?!?!


I don't know about you guys and your pooches, but Nells
always, always has to plop right down on top of whatever
we.are.doing.

he's just so cute though. he can ruffle my feathers any day.
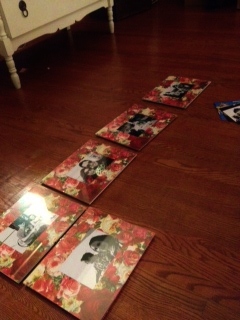
See how it's coming along now?!
You are basically making a piece of art!
You will have 5 frames going across,
and 3 frames going down.
And then you need to find a place to hang your finished product!
The total space is 50 wide by 24 high.


Your living room will get kinda messy. We had plastic Target bags to help us along the way, and put all our scraps and packaging/recyclables in there.
Welp, Nells found my heating pad! He loves that thing!

Now it's time to get hangin!
We decided to hang this lovely invention in our bedroom!
It's the perfect fit for above our bed. We moved into our new house 5 years ago
and still haven't come up with anything for above our bed, that's an important thing don't ya know!
So my husband can be kind of Griswald {Clark} that is, when it comes to doing stuff around the house, like fixing leaky faucets or a stuck door, so he happen to use a piece of yarn to line up the frames so they'd be even on the wall. You want to hang the frames side by side, no gaps.


I love it so far! One of the reasons I dig this project so much is because it's like a piece of art, but it's meaningful, and sentimental. And it's something you can do with someone. We picked out the photos one night, then the paper another, and weeks ago my husband ordered the frames.
It's like a collective piece of sorts.
We both have different gifts, and we were able to put those into practice with this project.
t a- d a !


toldja, on top of everything.

Total time I'd say less than 4 hours.
And it's nice b/c you can easily split up your time, and
do it on different nights.
I so hope you liked this, and give it a try! I imagine you could
use any photos; the magazine just showed it with a couple.
But you could do any theme really.
So fancy, yet so humble, and of course,
beautiful.
.JPG)

oh my! i LOVE it! good job! i really really like your bedding too!
ReplyDeletehow cute! you did a great job!!
ReplyDeletedrop by allister bee soon!
enter my giveaway for an amazing shabby apple dress!
love, Love, LOVE it!!!
ReplyDeleteGina! I love, love, love these! They turned out great!
ReplyDeletethis is so beautiful gina!
ReplyDeletei love that you and your husband did it together, too. :)
i love it.
xo
They look so great! LOVE the paper!
ReplyDeleteTHAT...is beautiful. i want to try, try, try.
ReplyDeletep.s. love that you put the award up there ^ (:
SoUtHeRnPiNkY.bLoGsPoT.cOm
Ah! What a gorgeous creative idea!! I think I will have to do this one!!
ReplyDeleteTo answer your question, oh yes, I love Andrew Wyeth's work! My favourites are his window paintings, they're gorgeous! <3
Have a wonderful day!
Oh my gosh Gina, THIS IS ADORABLE!!! I can't WAIT to try it!!! OH MY HECK, thanks for sharing! Your bed is ADORABLE too :) AND thanks so much for the sweet comment on our baby news last week, you are the best!
ReplyDeleteOh my goodness, how cute!!!
ReplyDeleteSUCH a cute idea. I love that fabric too..it looks great!
ReplyDeleteJenna
looks FABULOUS!!! you are so creative and crafty and this is just darling. your bedroom is beyond dreamy.
ReplyDeleteand NELLS!
just like pablo! just like a pup, i tell ya. one day, we'll look back and wish we had someone messing up our perfect space, that's for sure. they are the sweetest.
cute! simple, but yes, so beautiful! i really have to start doing something to our home... like put up pictures and stuff :)
ReplyDeleteThese are so cute! And I love the color of your couch, by the way.
ReplyDeleteGina I love them. God job friend.
ReplyDeleteThanks for yesterday.
XO
Hey Gina! Thanks so much for following my blog! I'm following back!
ReplyDeleteJanette the Jongleur
PS. That's such a fancy project you got going on ! I have no patience to undertake something like this.. I wish I did.. so major hat tippage to you!
Oh my goodness, lady! I adore this! It looks doable and so darling.
ReplyDeleteSo nice!!! I want something like that on my wall too!!! :D
ReplyDeleteTHis is so pretty!!
ReplyDeleteWhat a cute idea! :) It turned out really well!!
ReplyDeleteOh my, your wall art looks AMAZING! Such a wonderful job you've done. I don't think I would have that kind of patience, sadly.
ReplyDelete2000% awesomeness!!!
ReplyDeleteI used to hate those glass clip frames but that is such a great idea! And much easier than regular matting. Love it!
ReplyDeleteOh, and my cats are the same, the always have to be RIGHT where I'm doing something. Sigh.
And I have the same red bedding...
Cheers,
Swenja
Beautiful blog dear! your an inspiration!!!btw, i'm your newest follower now,hope u can take time to share some love by following me back,xoxoxo..
ReplyDeletehttp://mitchinheels.blogspot.com/
Oh I LIKE this! I may try this as inspiration for something in my dining room!
ReplyDelete